Requirements:
• Early-2008 or newer Mac Pro, iMac, or MacBook Pro:
• Late-2008 or newer MacBook Air or Aluminum Unibody MacBook:
• Early-2009 or newer Mac Mini or white MacBook:
• Early-2008 or newer Xserve:
Machines that ARE NOT supported:
• 2006-2007 Mac Pros, iMacs, MacBook Pros, and Mac Minis:
— The 2007 iMac 7,1 is compatible if the CPU is upgraded to a Penryn-based Core 2 Duo, such as a T9300.
• 2006-2008 MacBooks:
• 2008 MacBook Air (MacBookAir 1,1)
Things you'll need:
• A copy of the macOS Mojave Installer App. This can be obtained from the Mac App Store using a machine that supports Mojave, or by using the built-in downloading feature of the tool. In the Menu Bar, simply select "Tools > Download macOS Mojave..."

• A USB drive that's at least 16 GB in size
• A copy of the tool - Download:
• View changelog and download older versions here
Known issues:
• Graphics anomalies: Currently, pre-metal video cards used in Mojave will produce a weird darkish grey Menu Bar and Finder sidebar when using the light theme. In the dark theme, however, these anomalies are not present.
• AMD Radeon HD 5xxx/6xxx series GPU acceleration: Currently, it is not possible to get full graphics acceleration when running Mojave on a system with a Radeon HD 5xxx or 6xxx series GPU. Mojave will be almost UNUSABLE without graphics acceleration. This includes the 15" and 17" MacBook Pro systems (MacBookPro8,2 and 8,3). If you want to enable GPU acceleration on these machines, you'll need to disable the AMD GPU (This will work on MacBook Pro 8,2 and 8,3 systems ONLY. You CANNOT disable the AMD GPU in an iMac.) Weird colors will also be produced when running Mojave with one of these video cards installed/enabled. To disable the AMD GPU on a 2011 MacBook Pro 8,2 or 8,3, follow the guide found here.
• Early-2008 Mac Pro (MacPro3,1) GPU support: When running Mojave, you CANNOT use a newer AMD video card EVEN IF it is a Metal-comptible card and is supported in Mojave. The newer AMD drivers used in Mojave require the SSE4.2 instruction set, which the MacPro3,1 does not support. There is no way around this at this time. Your only GPU upgrade options for MacPro3,1 systems are nVidia cards, which work perfectly fine.
• Built-in iSight cameras: Currently, built-in iSight cameras do not work correctly on some machines. It seems to be hit or miss, but when installing, expect your iSight camera to be non-functional.
• Trackpad (MacBook5,2 affected only). The trackpad in the MacBook5,2 isn't fully supported in Mojave. While it works and is fully usable, Mojave detects it as just a standard mouse, preventing you from changing some trackpad-oriented settings.
• Unsupported WiFi modules in some systems. Macs that use the Broadcom BCM4321 WiFi module will not have functional WiFi when running Mojave. A fix for this is to open up your machine and install a compatible WiFi card. Machines affected include some MacPro3,1, MacBook5,2, MacBookPro4,1, iMac8,1, Macmini3,1, and MacBookAir2,1 systems. Please note that not all these machines will have an unsupported card, this is just a list of machines known to have shipped with that card in some configurations.
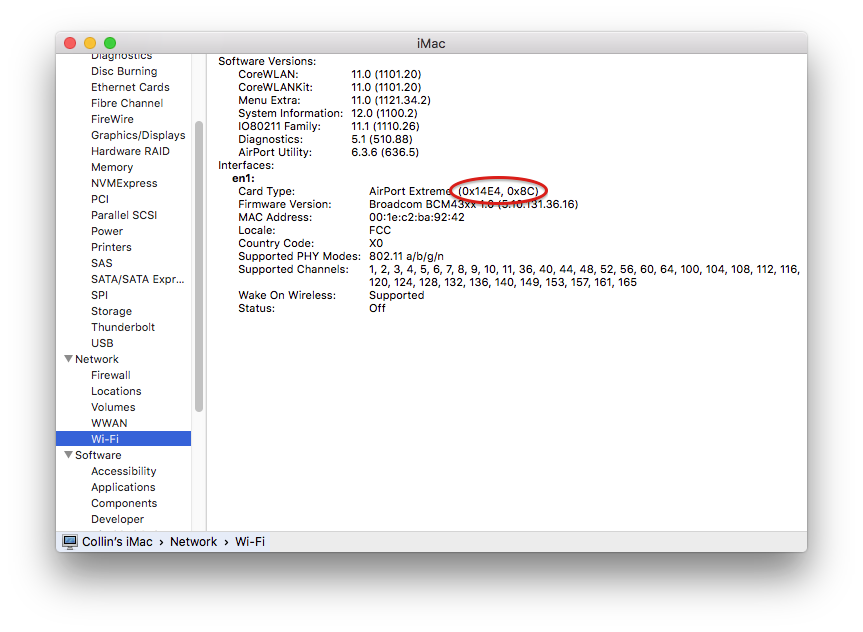
— You can find out whether or not you have an unsupported card by opening System Profiler (About this Mac>System Report...), and clicking on WiFi under the Network section. Take note of the value listed for "Card Type".
IDs that DO NOT work under Mojave:
• (0x14E4, 0x8C)
• (0x14E4, 0x9D)
• (0x14E4, 0x87)
• (0x14E4, 0x88)
• (0x14E4, 0x8B)
• (0x14E4, 0x89)
• (0x14E4, 0x90)
Any ID not listed, such as (0x14E4, 0x8D), is a supported card, and will work perfectly fine under Mojave.
How to use:
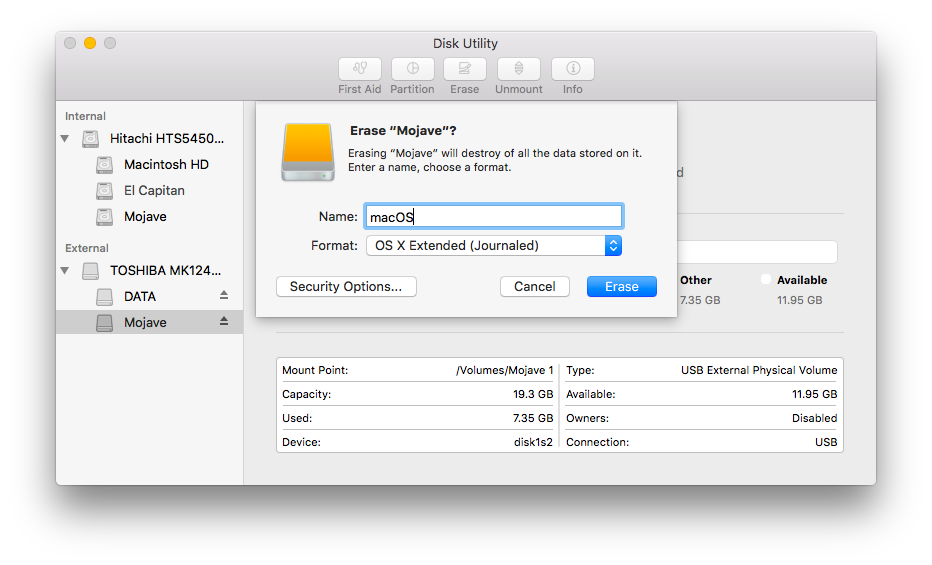
1. Insert your desired USB drive, open Disk Utility, and format it as OS X Extended (Journaled).
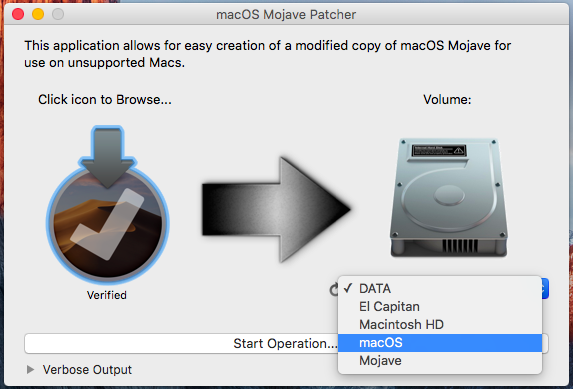
2. Open the "macOS Mojave Patcher" tool, and browse for your copy of the macOS Mojave Installer App.
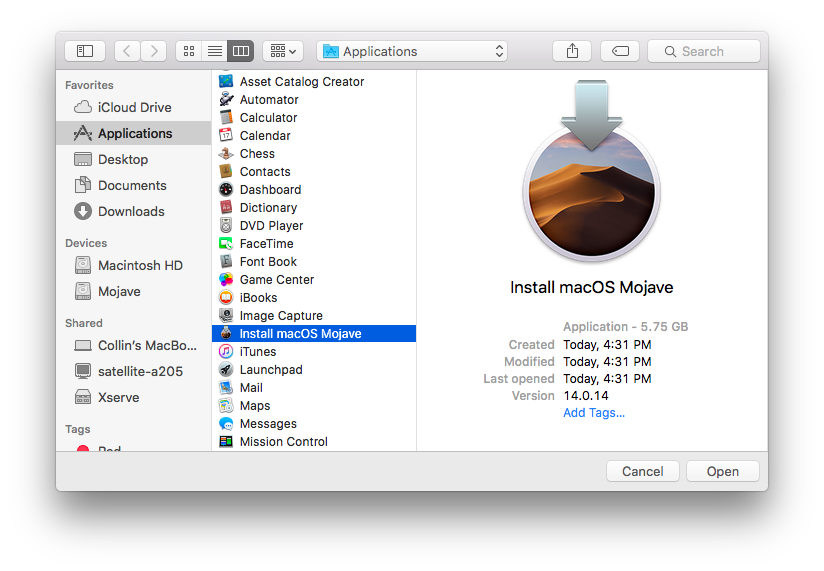
*Ensure that the tool successfully verifies the app.
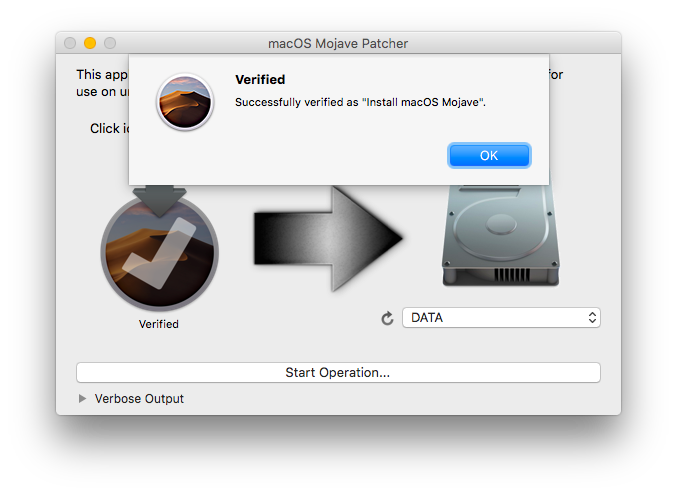
3. Next, select your USB drive in the Target Volume list, and click "Start Operation."
4. When the operation completes, boot your target unsupported Mac off the USB drive you just created by holding down the Option key while turning on the machine, and selecting the drive.

Note: Only perform steps 5 and 6 if you intend to do a clean install. Otherwise, you can simply skip these steps and install to your volume containg a previous version of OS X, and it'll do an in-place upgrade.
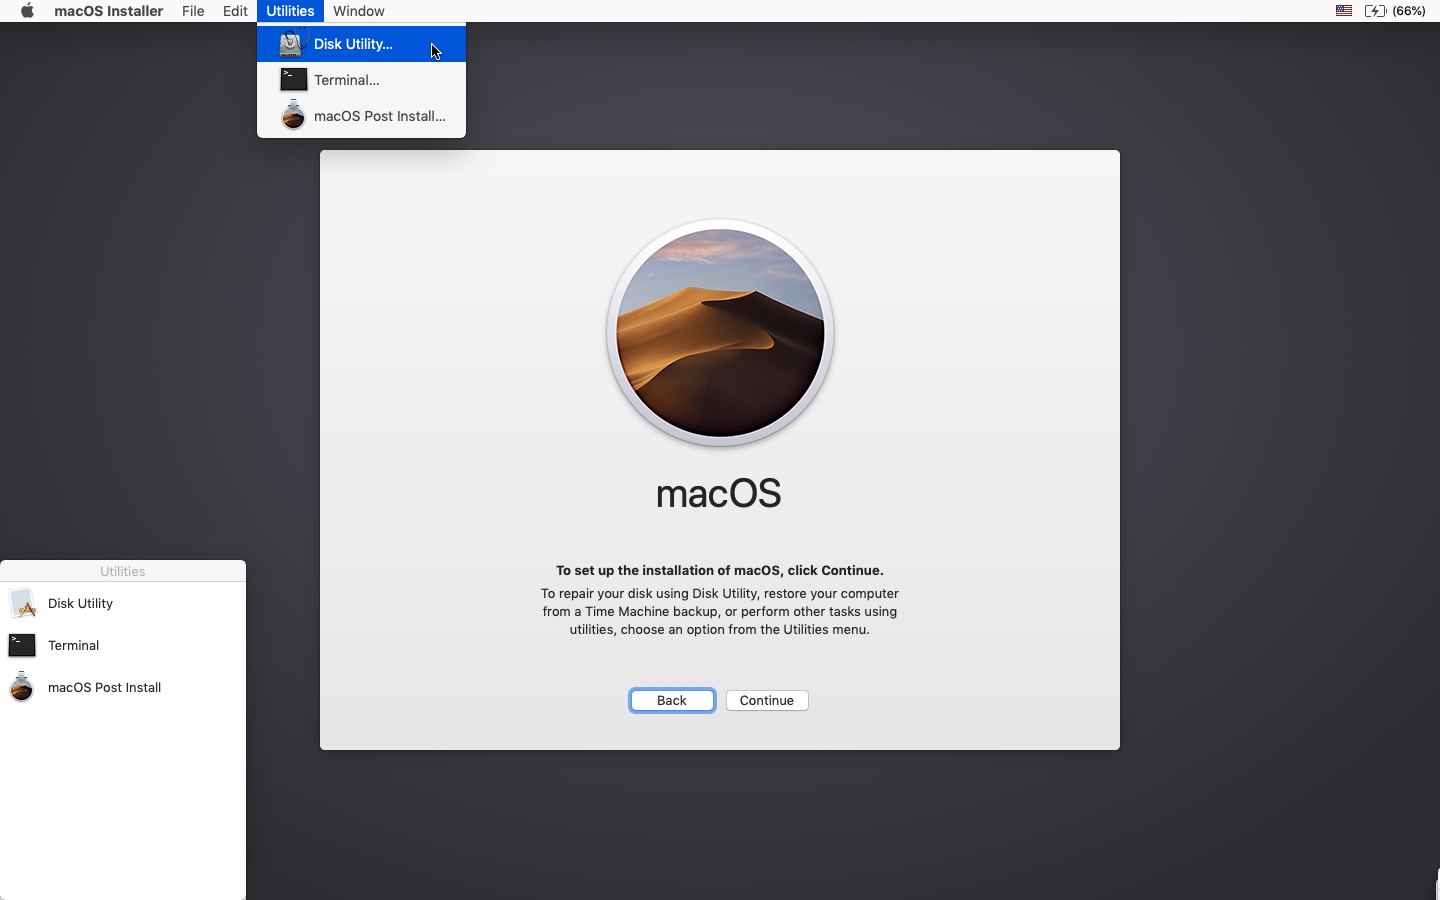
5. When the installer boots, open Disk Utility from the Utilities menu, or by double-clicking it in the Utilities window on the bottom left corner of the screen.
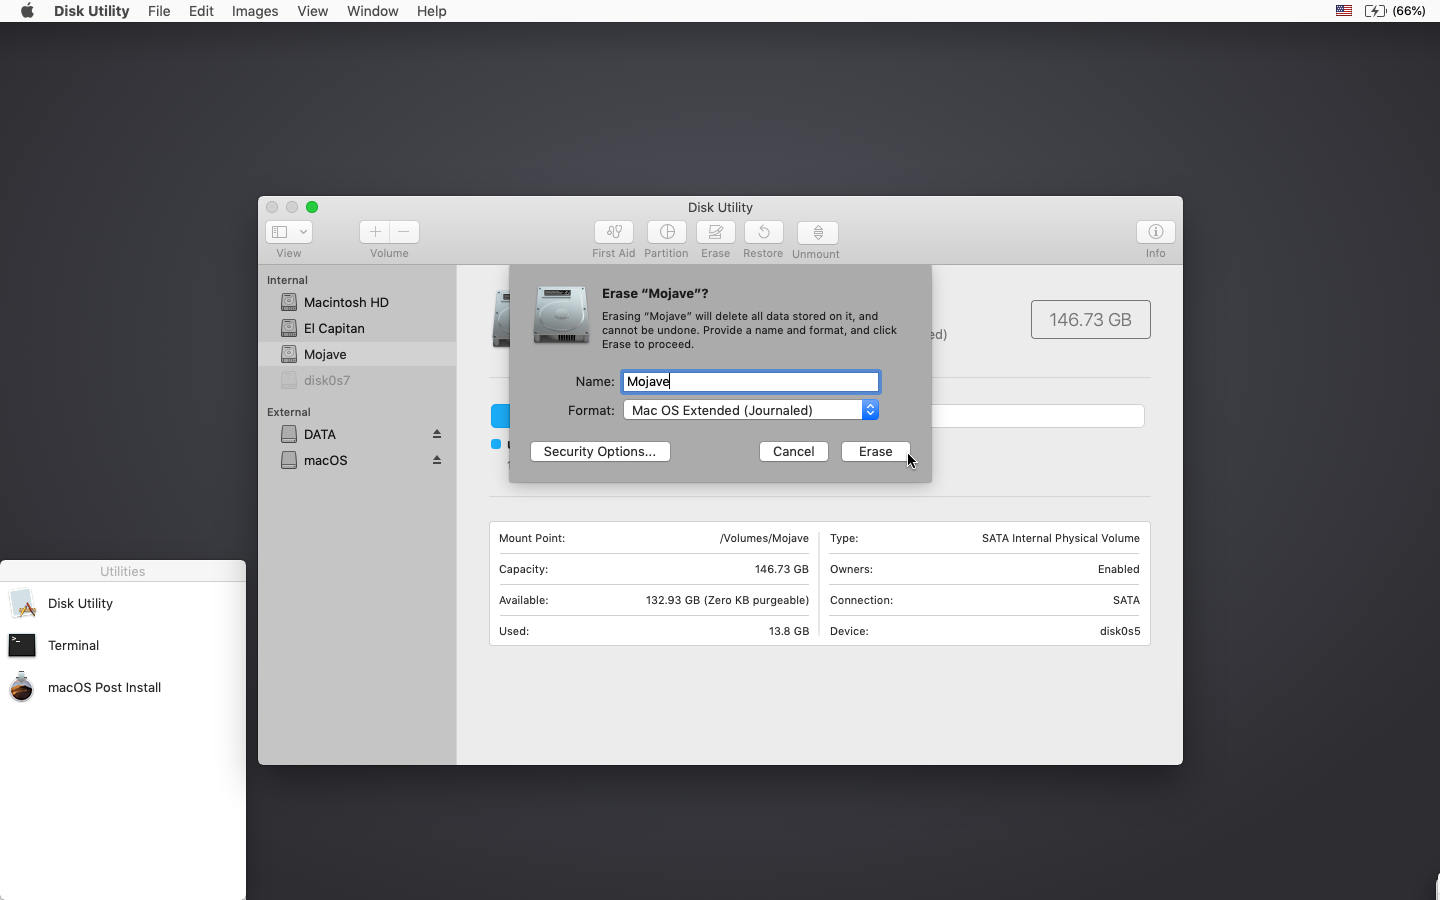
6. Select the disk or partition you want to install on, and erase it, ensuring to use either Mac OS Extended (Journaled), or APFS as the filesystem type. If formatting an entire drive, ensure GUID is selected.
• Using APFS on Late-2009 and later machines will work no differently than it did with High Sierra.
• It is recommended that you only use APFS if the target drive is an SSD.
• If you have a machine that did NOT natively support High Sierra (and therefore cannot boot APFS volumes natively), please note the following:
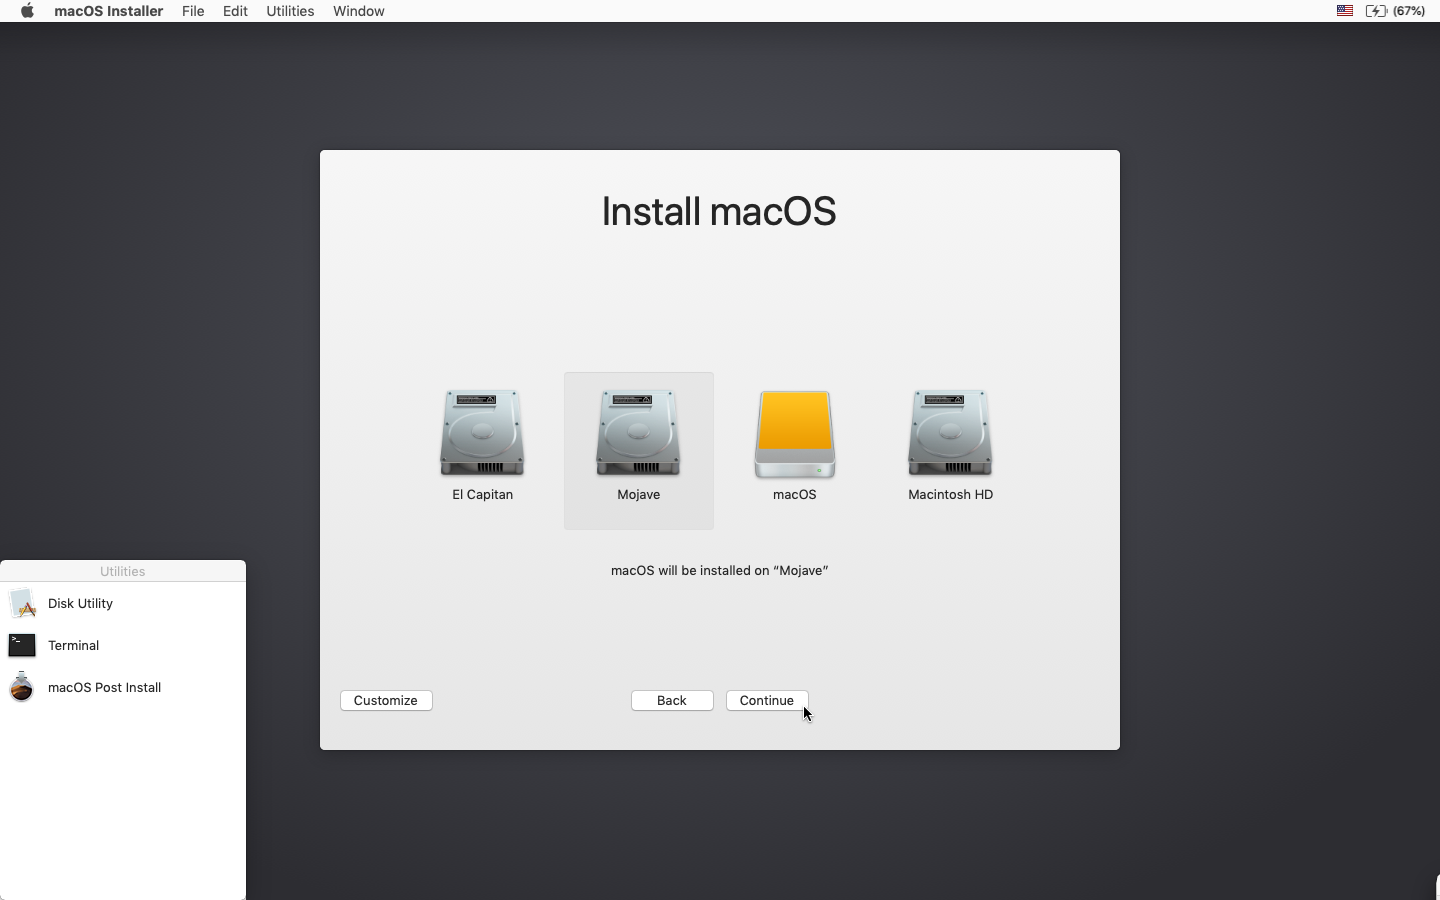
7. Install macOS normally onto the desired volume.
8. When the install completes, reboot back onto the installer drive. This time, open the "macOS Post Install" application.
9. In the application, select the Mac model you are using. The optimal patches will be selected for you based on the model you select. You can also select other patches of your choosing.

10. Select the volume you have just installed macOS Mojave on, and click "Patch." When it finishes patching, click "Reboot". It may sit there for a few moments rebuilding caches before rebooting.
• If for some reason the system fails to work correctly after rebooting, boot back into your installer drive, run the post install patch again, and select "Force Cache Rebuild" before rebooting. This isn't necessary under most circumstances.
11. When it reboots, it should now boot into a fully working copy of macOS Mojave.
Additional Info:
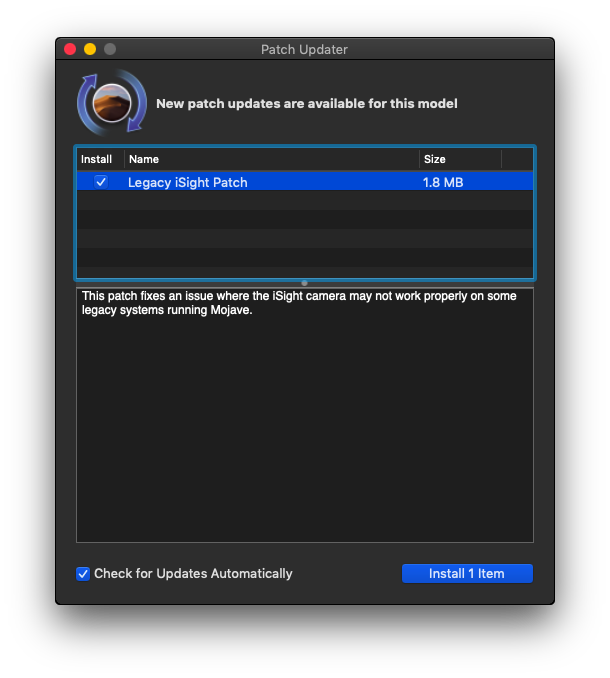
• If selected in the macOS Post Install tool, your Mojave install will have a program named "Patch Updater" located in your /Applications/Utilities folder. This program will alert you when new updates to patches are available for your machine, and will prompt you to install them. If you do not have Patch Updater installed, but would like it, you can download and run the script found here to do so.
Re-installing Patches
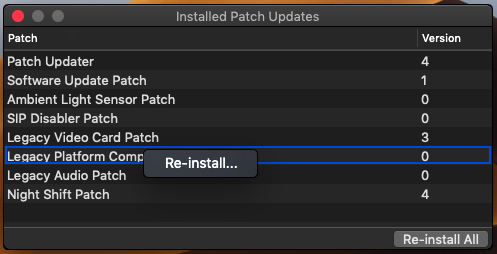
• During system updates, some patches may get overwritten. Using the Patch Updater tool, it is possible to re-install these patches with one click. To do so, open the Patch Updater application, and select "View Installed Updates", or use the "View > Show Installed Updates" menu in the Menu Bar.
• To re-install a patch, simply right-click on it in the list and select "Re-install". You can also select the "Re-install All" button to re-install all currently installed patches at once.
Updates
10.14.2
10.14.1
FAQ:
Q: The tool created the USB drive successfully, but when booting, the progress bar hangs a bit more than half way.
A: Check your copy of the Install macOS Mojave App. If you're using the latest version of the tool, you must be using the latest version of the Install macOS Mojave App. Version 1.1 of the patch tool and older support older versions of the installer app.
Q: The patch tool gives me errors, such as "Error copying files...".
A: Check to make sure your USB drive is writeable. Try re-formatting it, or just try a different USB drive.
Q: The patch tool gives me a "Mounting Failed" error
A: Open up Disk Utility, and verify that "InstallESD" is not mounted. If it is, eject it, and then try again. Also, check to make sure your Install macOS Mojave App is the correct one. It should be around 6GB in size. If you used the "Skip App Verification" option, you have most likely selected an invalid app that doesn't contain the necessary files.
Q: I don't see my hard drive partition in the installer screen or in the post-install tool.
A: Make sure FileVault is disabled, or use the instructions found here to unlock it manually using Terminal.
Q: I get a "NO" symbol when starting up after successfully installing Mojave.
A: Make sure you have run the post-install patch on the correct volume, as detailed above in steps 8-10.
Q: I get a "NO" symbol when starting up from the patched USB drive
A: Check the supported/not supported list at the top of this page. Ensure your machine is in the supported list.
Q: I get "NSURL" errors when trying to update my machine or use the App Store
A: This is usually the result of having an invalid CatalogURL set. To revert to stock, simply run "sudo softwareupdate --clear-catalog" in Terminal, and then run the software update patch script located above.
Q: Safari, App Store, and/or Mail stopped working after installing a system update
A: Download and run the Onyx application, select "Maintenence" at the top, then click the Run button.
Q: I get a "No packages were eligible for install" error when attepting to install Mojave
A: This is due to your system's date and time being set incorrectly. To fix it, you can either boot into your current OS X install and set the date, or you can use Terminal after booting from your patched USB installer drive to set the date. Instructions to set the date using Terminal can be found here.
• Early-2008 or newer Mac Pro, iMac, or MacBook Pro:
• MacPro3,1
• MacPro4,1
• iMac8,1
• iMac9,1
• iMac10,x
• iMac11,x (systems with AMD Radeon HD 5xxx and 6xxx series GPUs will be almost unusable when running Mojave. More details are located in the Known Issues section below.)
• iMac12,x (systems with AMD Radeon HD 5xxx and 6xxx series GPUs will be almost unusable when running Mojave. More details are located in the Known Issues section below.)
• MacBookPro4,1
• MacBookPro5,x
• MacBookPro6,x
• MacBookPro7,1
• MacBookPro8,x
• Late-2008 or newer MacBook Air or Aluminum Unibody MacBook:
• MacBookAir2,1
• MacBookAir3,x
• MacBookAir4,x
• MacBook5,1
• MacBookAir3,x
• MacBookAir4,x
• MacBook5,1
• Early-2009 or newer Mac Mini or white MacBook:
• Macmini3,1
• Macmini4,1
• Macmini5,x
• MacBook5,2
• MacBook6,1
• MacBook7,1
• Macmini4,1
• Macmini5,x
• MacBook5,2
• MacBook6,1
• MacBook7,1
• Early-2008 or newer Xserve:
• Xserve2,1
• Xserve3,1
• Xserve3,1
Machines that ARE NOT supported:
• 2006-2007 Mac Pros, iMacs, MacBook Pros, and Mac Minis:
• MacPro1,1
• MacPro2,1
• iMac4,1
• iMac5,x
• iMac6,1
• iMac7,1
• MacBookPro1,1
• MacBookPro2,1
• MacBookPro3,1
• Macmini1,1
• Macmini2,1
• MacPro2,1
• iMac4,1
• iMac5,x
• iMac6,1
• iMac7,1
• MacBookPro1,1
• MacBookPro2,1
• MacBookPro3,1
• Macmini1,1
• Macmini2,1
— The 2007 iMac 7,1 is compatible if the CPU is upgraded to a Penryn-based Core 2 Duo, such as a T9300.
• 2006-2008 MacBooks:
• MacBook1,1
• MacBook2,1
• MacBook3,1
• MacBook4,1
• MacBook2,1
• MacBook3,1
• MacBook4,1
• 2008 MacBook Air (MacBookAir 1,1)
Things you'll need:
• A copy of the macOS Mojave Installer App. This can be obtained from the Mac App Store using a machine that supports Mojave, or by using the built-in downloading feature of the tool. In the Menu Bar, simply select "Tools > Download macOS Mojave..."
• A USB drive that's at least 16 GB in size
• A copy of the tool - Download:
(Current version: 1.2.3, SHA1: 57cd15435e42ad8928ae3ff8f5a45033a0ed1d9e)
• View changelog and download older versions here
Known issues:
• Graphics anomalies: Currently, pre-metal video cards used in Mojave will produce a weird darkish grey Menu Bar and Finder sidebar when using the light theme. In the dark theme, however, these anomalies are not present.
• AMD Radeon HD 5xxx/6xxx series GPU acceleration: Currently, it is not possible to get full graphics acceleration when running Mojave on a system with a Radeon HD 5xxx or 6xxx series GPU. Mojave will be almost UNUSABLE without graphics acceleration. This includes the 15" and 17" MacBook Pro systems (MacBookPro8,2 and 8,3). If you want to enable GPU acceleration on these machines, you'll need to disable the AMD GPU (This will work on MacBook Pro 8,2 and 8,3 systems ONLY. You CANNOT disable the AMD GPU in an iMac.) Weird colors will also be produced when running Mojave with one of these video cards installed/enabled. To disable the AMD GPU on a 2011 MacBook Pro 8,2 or 8,3, follow the guide found here.
• Early-2008 Mac Pro (MacPro3,1) GPU support: When running Mojave, you CANNOT use a newer AMD video card EVEN IF it is a Metal-comptible card and is supported in Mojave. The newer AMD drivers used in Mojave require the SSE4.2 instruction set, which the MacPro3,1 does not support. There is no way around this at this time. Your only GPU upgrade options for MacPro3,1 systems are nVidia cards, which work perfectly fine.
• Built-in iSight cameras: Currently, built-in iSight cameras do not work correctly on some machines. It seems to be hit or miss, but when installing, expect your iSight camera to be non-functional.
• Trackpad (MacBook5,2 affected only). The trackpad in the MacBook5,2 isn't fully supported in Mojave. While it works and is fully usable, Mojave detects it as just a standard mouse, preventing you from changing some trackpad-oriented settings.
• Unsupported WiFi modules in some systems. Macs that use the Broadcom BCM4321 WiFi module will not have functional WiFi when running Mojave. A fix for this is to open up your machine and install a compatible WiFi card. Machines affected include some MacPro3,1, MacBook5,2, MacBookPro4,1, iMac8,1, Macmini3,1, and MacBookAir2,1 systems. Please note that not all these machines will have an unsupported card, this is just a list of machines known to have shipped with that card in some configurations.
— You can find out whether or not you have an unsupported card by opening System Profiler (About this Mac>System Report...), and clicking on WiFi under the Network section. Take note of the value listed for "Card Type".
IDs that DO NOT work under Mojave:
• (0x14E4, 0x8C)
• (0x14E4, 0x9D)
• (0x14E4, 0x87)
• (0x14E4, 0x88)
• (0x14E4, 0x8B)
• (0x14E4, 0x89)
• (0x14E4, 0x90)
Any ID not listed, such as (0x14E4, 0x8D), is a supported card, and will work perfectly fine under Mojave.
How to use:
1. Insert your desired USB drive, open Disk Utility, and format it as OS X Extended (Journaled).
2. Open the "macOS Mojave Patcher" tool, and browse for your copy of the macOS Mojave Installer App.
*Ensure that the tool successfully verifies the app.
3. Next, select your USB drive in the Target Volume list, and click "Start Operation."
4. When the operation completes, boot your target unsupported Mac off the USB drive you just created by holding down the Option key while turning on the machine, and selecting the drive.
Note: Only perform steps 5 and 6 if you intend to do a clean install. Otherwise, you can simply skip these steps and install to your volume containg a previous version of OS X, and it'll do an in-place upgrade.
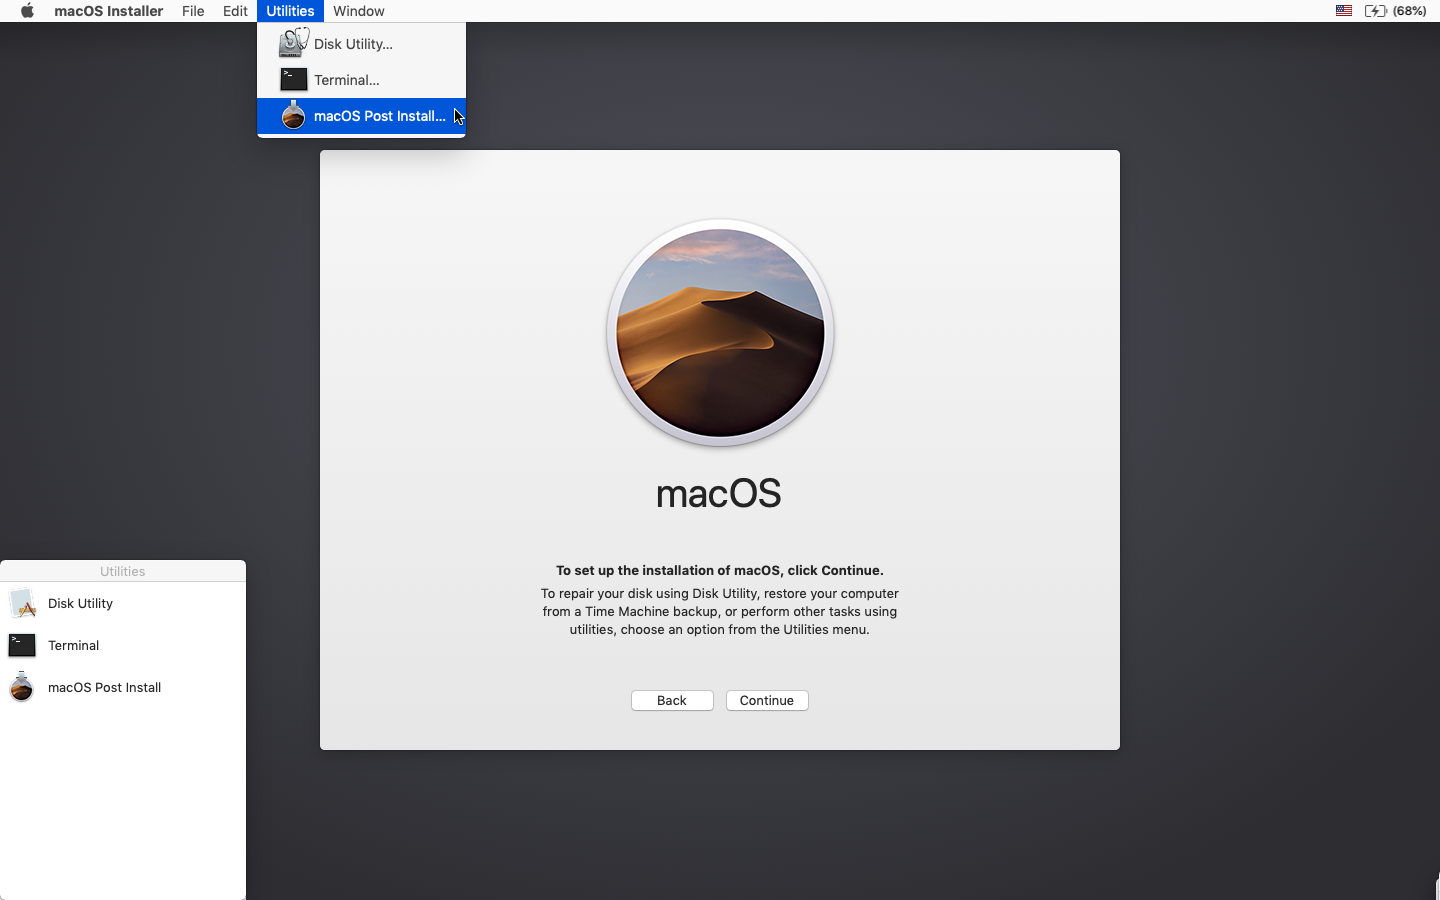
5. When the installer boots, open Disk Utility from the Utilities menu, or by double-clicking it in the Utilities window on the bottom left corner of the screen.
6. Select the disk or partition you want to install on, and erase it, ensuring to use either Mac OS Extended (Journaled), or APFS as the filesystem type. If formatting an entire drive, ensure GUID is selected.
• Using APFS on Late-2009 and later machines will work no differently than it did with High Sierra.
• It is recommended that you only use APFS if the target drive is an SSD.
• If you have a machine that did NOT natively support High Sierra (and therefore cannot boot APFS volumes natively), please note the following:
— If you use APFS, you will not have a bootable Recovery partition.
— If you decide to use APFS, a custom booting method will be installed by the post-install tool, as the firmware of these unsupported machines does not natively support booting from APFS volumes. It is not quite as clean as native booting, but will not cause any issues while running Mojave. A demo of the modified booting process can be viewed here.
— If you decide to use APFS, a custom booting method will be installed by the post-install tool, as the firmware of these unsupported machines does not natively support booting from APFS volumes. It is not quite as clean as native booting, but will not cause any issues while running Mojave. A demo of the modified booting process can be viewed here.
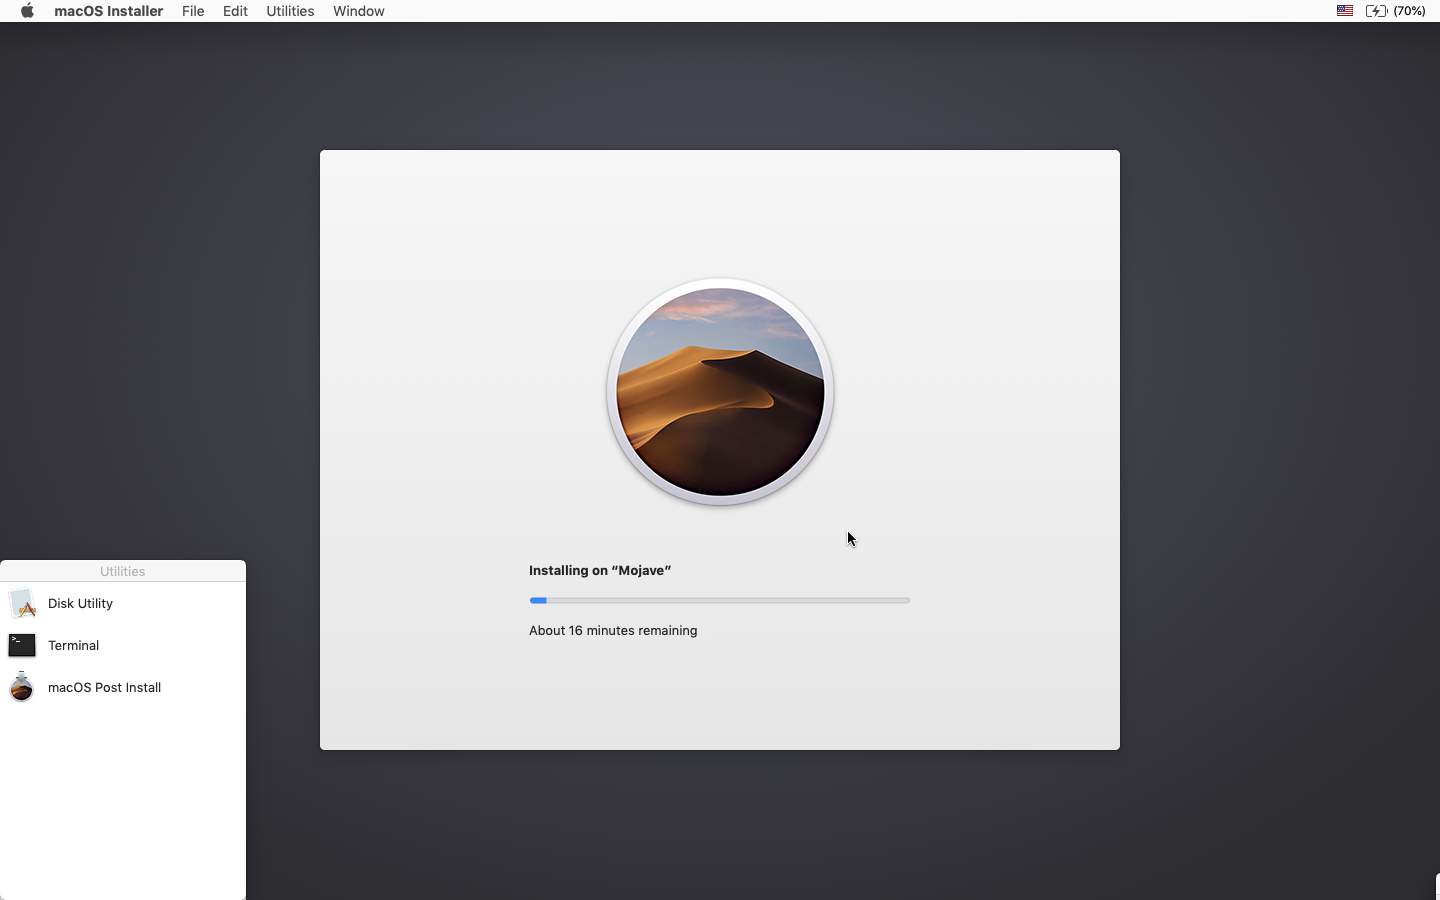
7. Install macOS normally onto the desired volume.
8. When the install completes, reboot back onto the installer drive. This time, open the "macOS Post Install" application.
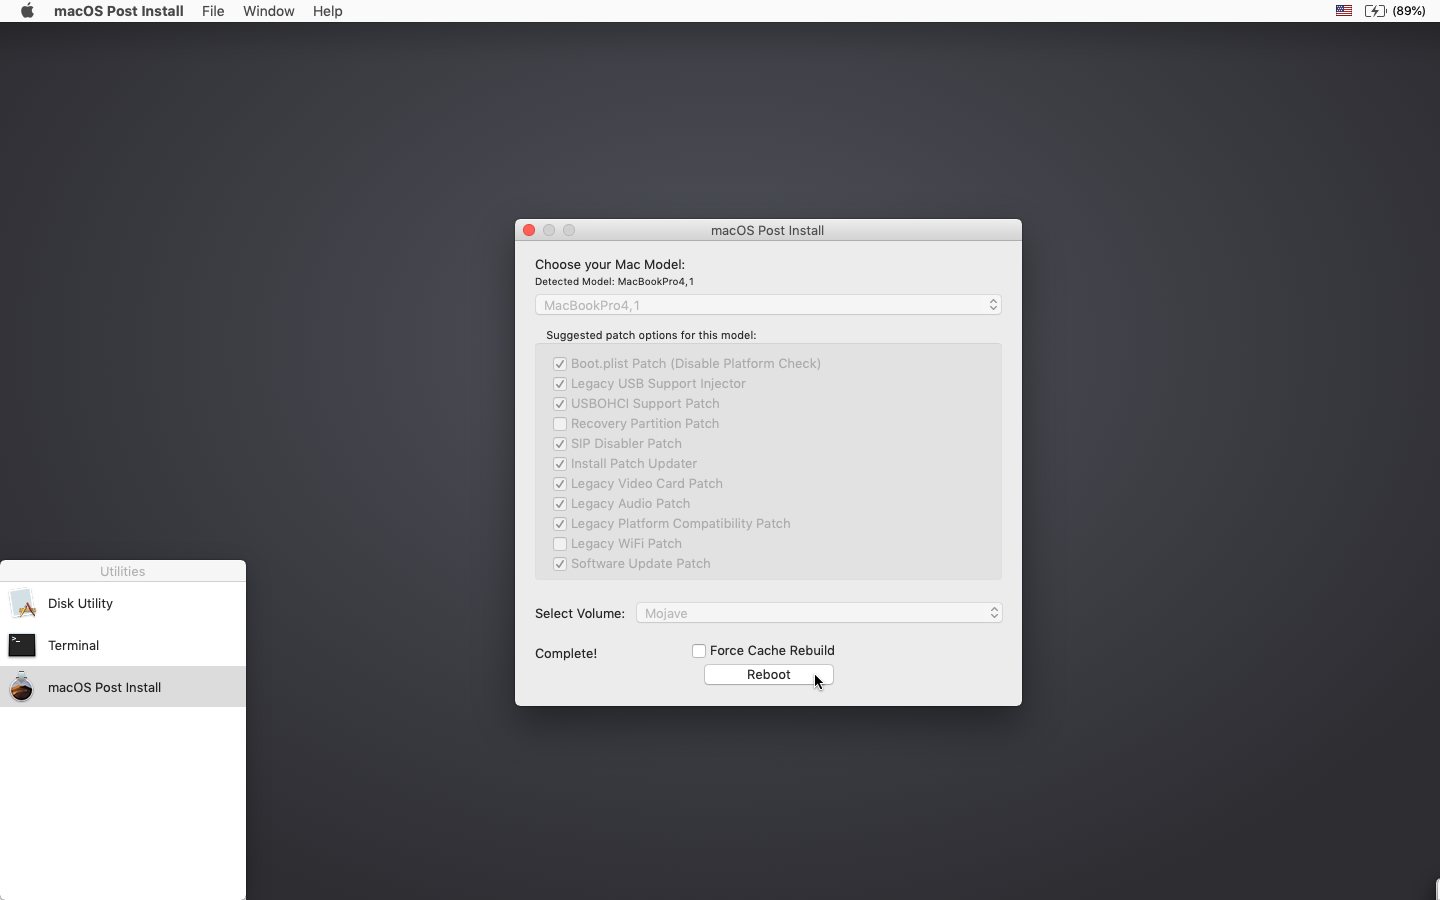
9. In the application, select the Mac model you are using. The optimal patches will be selected for you based on the model you select. You can also select other patches of your choosing.
10. Select the volume you have just installed macOS Mojave on, and click "Patch." When it finishes patching, click "Reboot". It may sit there for a few moments rebuilding caches before rebooting.
• If for some reason the system fails to work correctly after rebooting, boot back into your installer drive, run the post install patch again, and select "Force Cache Rebuild" before rebooting. This isn't necessary under most circumstances.
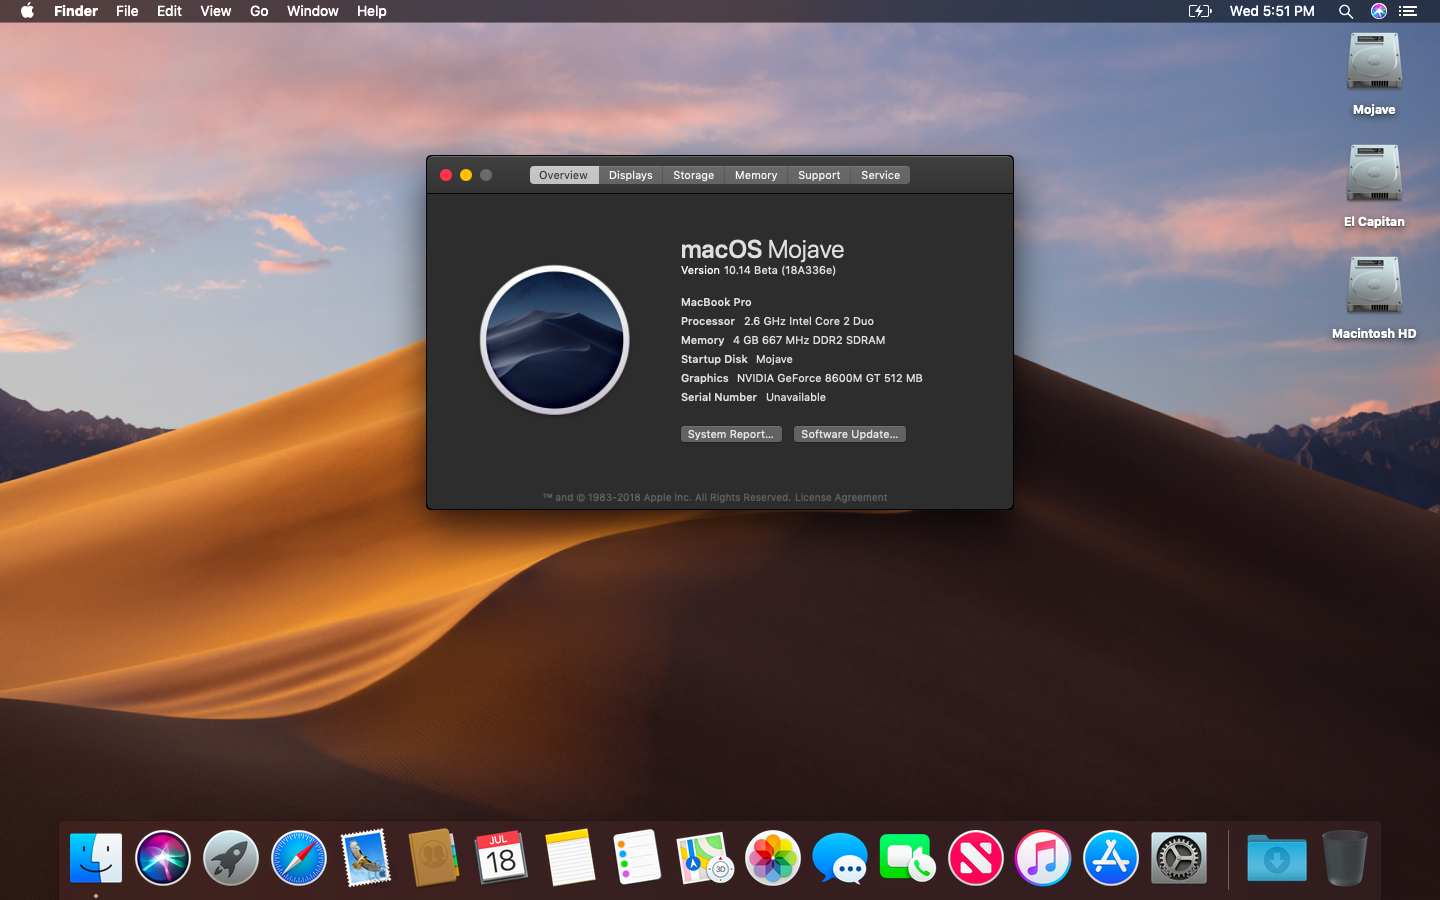
11. When it reboots, it should now boot into a fully working copy of macOS Mojave.
Additional Info:
• If selected in the macOS Post Install tool, your Mojave install will have a program named "Patch Updater" located in your /Applications/Utilities folder. This program will alert you when new updates to patches are available for your machine, and will prompt you to install them. If you do not have Patch Updater installed, but would like it, you can download and run the script found here to do so.
Re-installing Patches
• During system updates, some patches may get overwritten. Using the Patch Updater tool, it is possible to re-install these patches with one click. To do so, open the Patch Updater application, and select "View Installed Updates", or use the "View > Show Installed Updates" menu in the Menu Bar.
• To re-install a patch, simply right-click on it in the list and select "Re-install". You can also select the "Re-install All" button to re-install all currently installed patches at once.
Updates
10.14.2
If you are currently running 10.14.1, you can simply use the Software Update pane of System Preferences to apply the 10.14.2 update. Once the update is installed, you will most likely need to re-apply post-install patches to get the system to boot again. This process is detailed in steps 8 - 10 above. If you are currently running 10.14.0, you'll need to proceed with the 10.14.1 update method described below.
10.14.1
The Mojave 10.14.1 update does NOT install properly on unsupported machines, and could result in an unbootable OS. If you want to install the 10.14.1 update (and are not currently running 10.14.1), perform the following steps:
• Download the latest version of Mojave Patcher
• Download the installer using the Tools menu of Mojave Patcher
• Create a patched USB installer
• Boot from that, and install 10.14.1 onto the volume containing an older release.
• Once done, apply the post-install patches, and you should now be on 10.14.1.
FAQ:
Q: The tool created the USB drive successfully, but when booting, the progress bar hangs a bit more than half way.
A: Check your copy of the Install macOS Mojave App. If you're using the latest version of the tool, you must be using the latest version of the Install macOS Mojave App. Version 1.1 of the patch tool and older support older versions of the installer app.
Q: The patch tool gives me errors, such as "Error copying files...".
A: Check to make sure your USB drive is writeable. Try re-formatting it, or just try a different USB drive.
Q: The patch tool gives me a "Mounting Failed" error
A: Open up Disk Utility, and verify that "InstallESD" is not mounted. If it is, eject it, and then try again. Also, check to make sure your Install macOS Mojave App is the correct one. It should be around 6GB in size. If you used the "Skip App Verification" option, you have most likely selected an invalid app that doesn't contain the necessary files.
Q: I don't see my hard drive partition in the installer screen or in the post-install tool.
A: Make sure FileVault is disabled, or use the instructions found here to unlock it manually using Terminal.
Q: I get a "NO" symbol when starting up after successfully installing Mojave.
A: Make sure you have run the post-install patch on the correct volume, as detailed above in steps 8-10.
Q: I get a "NO" symbol when starting up from the patched USB drive
A: Check the supported/not supported list at the top of this page. Ensure your machine is in the supported list.
Q: I get "NSURL" errors when trying to update my machine or use the App Store
A: This is usually the result of having an invalid CatalogURL set. To revert to stock, simply run "sudo softwareupdate --clear-catalog" in Terminal, and then run the software update patch script located above.
Q: Safari, App Store, and/or Mail stopped working after installing a system update
A: Download and run the Onyx application, select "Maintenence" at the top, then click the Run button.
Q: I get a "No packages were eligible for install" error when attepting to install Mojave
A: This is due to your system's date and time being set incorrectly. To fix it, you can either boot into your current OS X install and set the date, or you can use Terminal after booting from your patched USB installer drive to set the date. Instructions to set the date using Terminal can be found here.
